23 HSE Support - Healthcare Professional Guide | RedZinc Services
HOW TO USE BLUEEYE CLINIC

Healthcare Professional Guide

Send us an email at support@blueeye.video to set up your BlueEye Clinic account. You can also contact BlueEye Telehealth lead Ann Scanlon in HSE at ann.scanlon1@hse.ie.

You must have received an email from RedZinc with the subject “Welcome to BlueEye Clinic”. This email contains your login details (username and password) along with the set-up instructions.
Visit https://hse.blueeye.video/ and sign in using your username and password.

After logging in, you will see below options on the screen
hse1 HSE Support - Healthcare Professional Guide | RedZinc Services

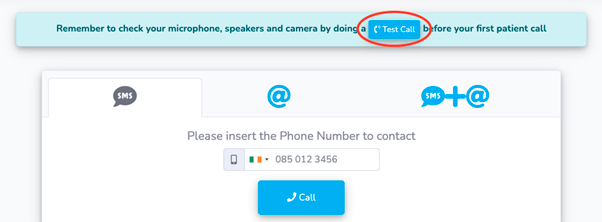
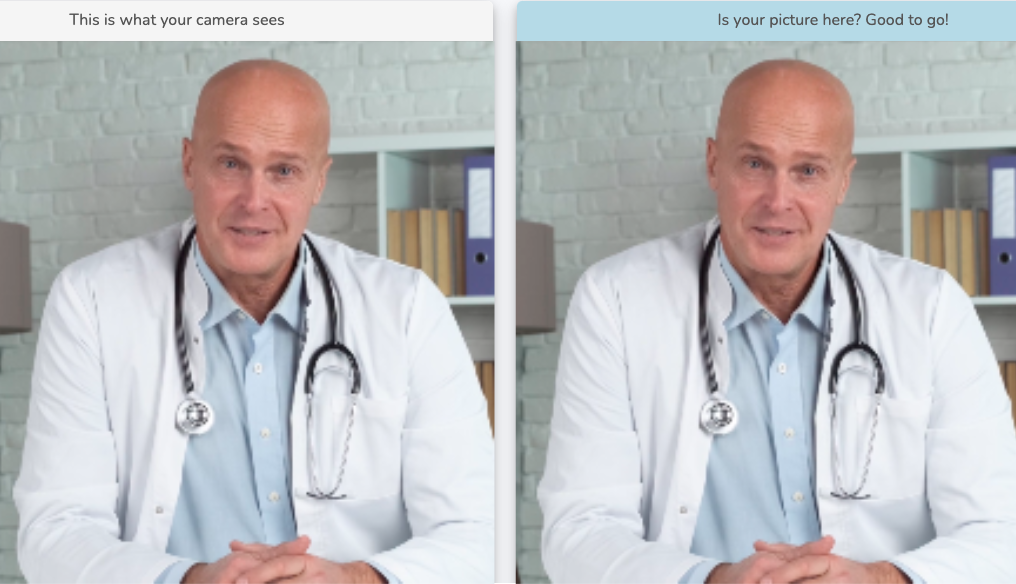
Click on the ‘Test Call’ option either on the menu bar at the left side of the screen or as marked red in the above image. Allow the browser to access your camera and microphone to initiate the test call. During the Test Call, you will see a screen as in the image below:
Test-call-HCP-1-1 HSE Support - Healthcare Professional Guide | RedZinc Services

Please Note: From the two videos shown on the screen, ‘This is what your camera sees’ is how the patient will appear to you and ‘Is your picture here? Good to go!’ is how your video will appear to the patient.

Click on ‘End Test’ icon just below the two videos to end the test call.

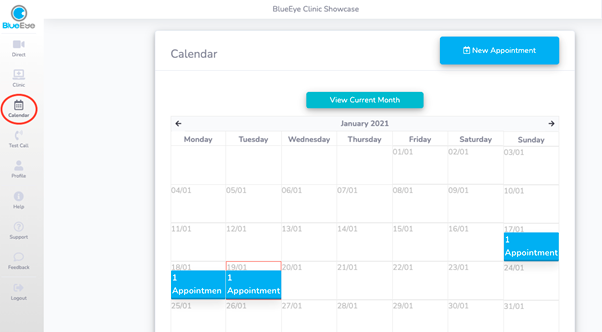
Calendar With help of calendar, you can view the list of appointments scheduled across the months. You can also set up new appointment or edit existing appointments from the calendar page. Please note that the appointments occurred in previous dates cannot be edited.
hse3 HSE Support - Healthcare Professional Guide | RedZinc Services

Waiting Room As soon as the patient clicks the link to video call in text message or email, they are directed to the self- test page with an option to enter the waiting room.

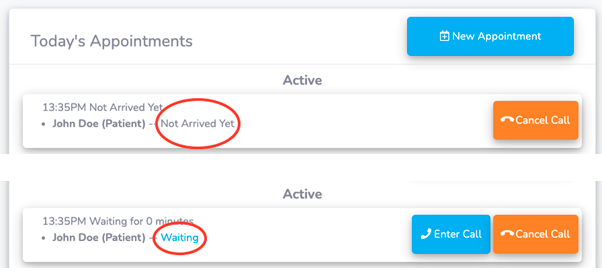
When the patient clicks on “Enter Waiting Room” option in self-test page, they enter the waiting room. As soon as the patient enters the waiting room, the patient status on your clinic page changes from “Not arrived yet” to “Waiting” under ‘Today’s Appointments’ section.
hs4 HSE Support - Healthcare Professional Guide | RedZinc Services

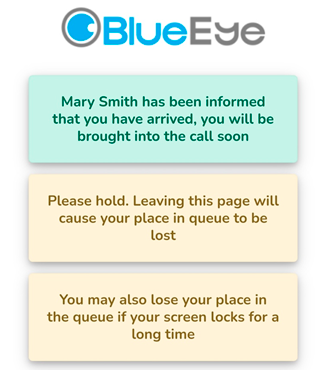
While the patient waits in the waiting room, they are displayed below messages on the screen:
hse5 HSE Support - Healthcare Professional Guide | RedZinc Services

4.1. How to schedule an appointment with a patient?

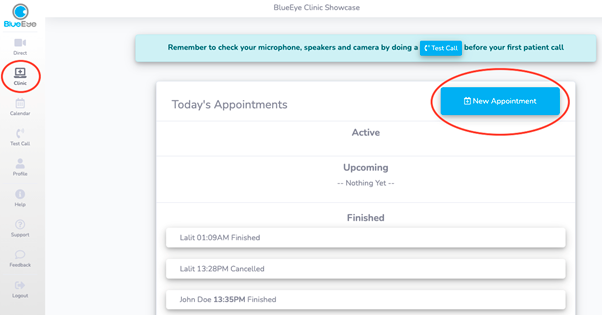
Click on ‘Clinic’ option on the menu bar at the left side of the screen. Then click on the blue coloured ‘New Appointment’ icon, select the appropriate date & time, fill the patient details (Patient initials, Patient number, Patient email) and click on ‘Create’ option to schedule the appointment.
hse6 HSE Support - Healthcare Professional Guide | RedZinc Services
Note: In order to schedule a multi-party call, click on ‘Add Participants’ button given on the ‘New Appointment’ page. This will open another field to enter participant name and/or email address for invitation. This option will allow you to invite up to 14 participants to the call.

4.2. How is the patient notified about the scheduled appointment?

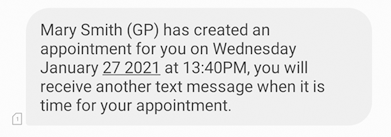
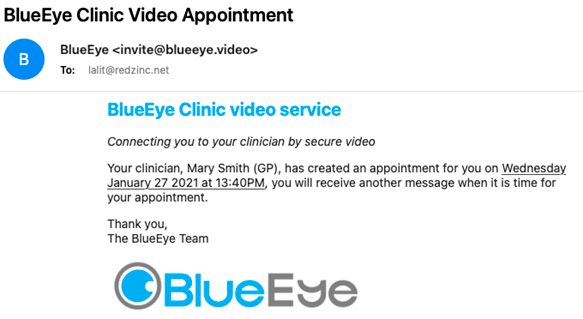
After you enter the patient details in the patient information section and click on ‘Create’ option, the patient receives a notification on their mobile number and/ or email id (registered while booking the appointment). The sample message and email are given below:

hse7 HSE Support - Healthcare Professional Guide | RedZinc Services

hse8 HSE Support - Healthcare Professional Guide | RedZinc Services

Note- Another message and email are sent to the patient 5 minutes before the scheduled appointment time which contain the secure link for the video call.

4.3. How to view the list of all the appointments scheduled for the day?

Click on the ‘Today’s Clinic’ icon icon1 HSE Support - Healthcare Professional Guide | RedZinc Services on the home page (or ‘Clinic’ option on the menu bar at the left side of the screen). This will open a page displaying a list of all the appointments scheduled for the day under the heading ‘Today’s Appointments’.

Under the sub- heading ‘Active’ are all the appointments where the link for the video call has been sent to the patient and they need to initiate the call from their end.

The sub-heading ‘Upcoming’ includes all the appointments which are scheduled for the rest of the day and the link for the video call has not yet been sent to the patient.

Whereas the sub- heading ‘Finished’ includes a list of all the appointments in the day which have already been attended.

4.4. How to view the list of past or future appointments?

Click on the ‘Calendar’ icon icon3 HSE Support - Healthcare Professional Guide | RedZinc Services on the home page (or ‘Calendar’ option on the menu bar at the left side of the screen). This will open a calendar for the current month showing the number of appointments scheduled on particular dates. Click on the blue box under a date to view further details on all the appointments scheduled on the corresponding day.

4.5. How to reschedule or cancel an appointment?

Click on ‘Calendar’ option on the menu bar at the left side of the screen. Then click on the blue box under the appropriate date, which will open a list of all the appointments scheduled on that date. Check the patient name and appointment time and click on ‘Edit’ option to cancel or reschedule an appointment.

4.6. How to access the historical call details?

Click on ‘Calendar’ option on the menu bar at the left side of the screen. This will open a calendar showing the appointments in the current month. You can navigate between months by using icons given on top of the calendar. Navigate to the appropriate month and click on the blue box under the relevant date in the calendar. From the list of appointments, click on the view icon against the relevant appointment to view the call details.

5.1. How to establish the video connection at the time of the appointment?

After you schedule a call, the patient receives an email/ message with the information that the call has been scheduled at a specified time. Another email/ message is sent to the patient 5 minutes before the call which contains the link and the PIN code for the video call.

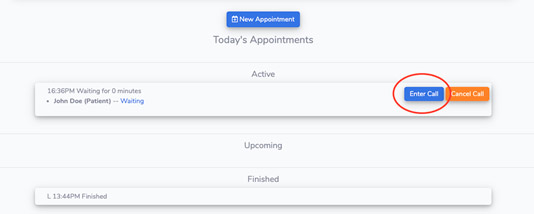
At the scheduled time, after the patient clicks on the video link and allows the browser to access their camera and microphone, you will see an ‘Enter call’ option appear with the patient name under Today’s Appointments heading in Clinic. Click on ‘Enter call’ icon and allow the browser to access your camera and microphone in order to successfully establish the video connection.

hse10 HSE Support - Healthcare Professional Guide | RedZinc Services

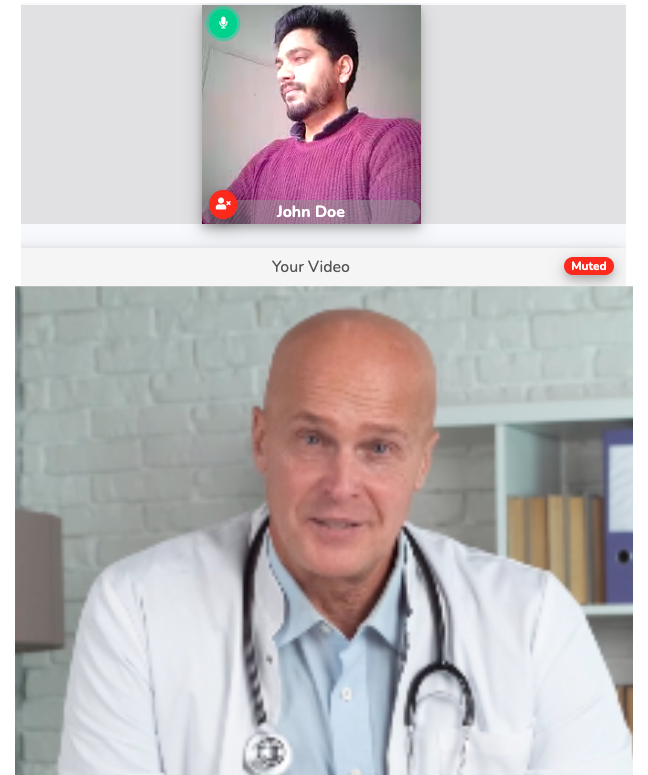
After you allow the browser to access camera and microphone, you will see below screen:

Live-Call-HCP HSE Support - Healthcare Professional Guide | RedZinc Services

The small video on the top is that of the patient and the one below titled ‘Your Video’ is your own video.

After the consultation is concluded, you can end the call for all the participants by clicking on the ‘End call’ icon icon4 HSE Support - Healthcare Professional Guide | RedZinc Services given at the bottom of ‘Your Video’.

5.2. How to add participants during an ongoing call?

Click on the ‘Add Participant’ icon icon5 HSE Support - Healthcare Professional Guide | RedZinc Services given at the top of the screen, enter the participant details and click on invite to send a call invitation to the participant. The invitation message/ email contains the link for the video call and the PIN code.

After the participant clicks on the video link, they are automatically guided to the call via waiting room after they allow the browser to access their camera and microphone.

5.3. Controls on your own video

Pause video option You can click on the video icon icon6 HSE Support - Healthcare Professional Guide | RedZinc Services at the bottom of ‘Your Video’ window to pause the video transmission from your end. Click on the icon again to resume the video transmission.

Mute audio option You can click on the microphone icon icon12 HSE Support - Healthcare Professional Guide | RedZinc Services at the bottom of ‘Your Video’ window to mute the audio transmission from your end. Click on the icon again to resume the audio transmission.

Settings You can change the microphone, camera and speaker settings by clicking on the settings icon given on the menu bar above the video. These options allow icon13 HSE Support - Healthcare Professional Guide | RedZinc Services you to select the appropriate microphone, camera and speaker.

5.4. Controls on the other participants’ video

Mute audio option You can mute a participant during the video call by clicking on the microphone icon icon12 HSE Support - Healthcare Professional Guide | RedZinc Services in the corresponding patient window.

Remove patient option You can remove a participant from the group call by clicking on the participants icon icon14 HSE Support - Healthcare Professional Guide | RedZinc Services in the corresponding participant window.

Swap participant smartphone camera During a video call, you can swap a participant’s smartphone camera from front to rear and vice versa by clicking on the Screenshot-2022-10-04-at-5.44.43-PM HSE Support - Healthcare Professional Guide | RedZinc Services button.

5.5. Time limit for the group video call

There is no time limit for the video call. The call can be carried out as long as needed.

5.6. How to share system screen with the other participants?

Click on the ‘Share Screen’ icon icon111 HSE Support - Healthcare Professional Guide | RedZinc Services given at the bottom of the screen. This will open a pop up showing the options to share entire screen, application window or a particular web browser tab. Select the suitable option and click on share to start sharing screen with the participants.

To stop sharing the screen with the participants, either click on the ‘Stop’ icon icon112 HSE Support - Healthcare Professional Guide | RedZinc Services showing on the screen which is being shared or click on the ‘Stop Sharing’ icon icon113 HSE Support - Healthcare Professional Guide | RedZinc Services showing in the BlueEye tab.

5.7. How can I allow the participant to share screen during a video call?

Click on the ‘Pass Screenshare Control’ Screenshot-2022-10-04-at-3.54.10-PM HSE Support - Healthcare Professional Guide | RedZinc Services button in the participant video to allow the participant to share screen. The participant gets an option to share screen by clicking on the three dots in the video controls.

You can reclaim the screen share option via the ‘Reclaim Screenshare’ button in the video control panel.

5.8. How can I send or receive a file/document from a participant?

Click on the Screenshot-2022-10-04-at-5.18.07-PM HSE Support - Healthcare Professional Guide | RedZinc Services button beneath your video, select the file and click send to send a file to a participant. The participant receives a notification in the chat box along with an option to download the file. The participant can also send a file to you using the File transfer button in their video call.

5.8. How to resolve an issue with the audio/ video transmission during a call?

Click on the ‘Refresh Videos’ icon icon114 HSE Support - Healthcare Professional Guide | RedZinc Services given at the top of the screen if you encounter an issue with the audio/ video transmission during the call.

5.9. How to chat with the patients during the group video call?

Click on the ‘Chat’ icon icon21 HSE Support - Healthcare Professional Guide | RedZinc Services to access the chat window. In the chat window, select ‘All participants’ if you want to chat with the whole group or select the participant name if you want to chat privately with a single participant.

Please Note: The patients can either chat with the whole group or with the healthcare provider privately. They cannot chat with other patients privately.

6.1.What is ClinicLink?

ClinicLink is a new feature on BlueEye Clinic. It allows healthcare professionals using BlueEye Clinic to create a personalized web link or URL, which they can then share with their patients to connect over video.

A typical web link or URL looks like this example:

https://blueeye.video/cliniclink/drsmithclinic

where drsmithclinic is the personalised clinic name chosen by Dr. Smith for his virtual clinic.

We suggest you use your own name or a name that will identify your clinic such as Dr. Smith Clinic as shown in the example above.

6.2. How to create a personalised ClinicLink

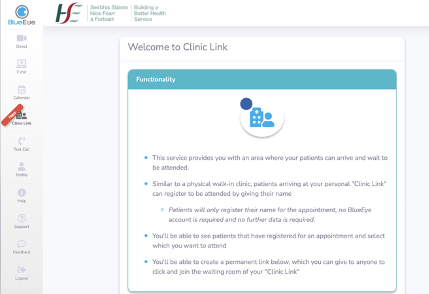
Post logging into your BlueEye account, you will see ClinicLink-logo HSE Support - Healthcare Professional Guide | RedZinc Services button in the navigation panel on the left side of the dashboard.

Clicking on this button will take you to a screen with instructions on ClinicLink as given below

ClinicLink-homepage HSE Support - Healthcare Professional Guide | RedZinc Services

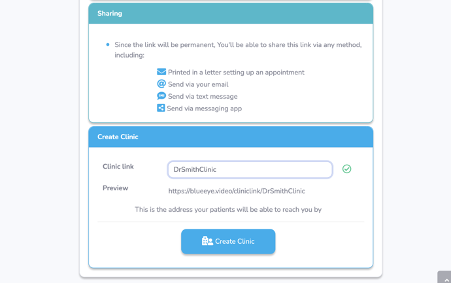
If you scroll down, you will see the ‘Create Clinic’ option where you can enter your preferred clinic name and then click on the ‘Create Clinic’ button beneath to generate your permanent ClinicLink.

ClinicLink-setup HSE Support - Healthcare Professional Guide | RedZinc Services

Note: This is a one-time activity. The ClinicLink that you choose to create is permanent and the option to create another ClinicLink is no longer available after you create one.

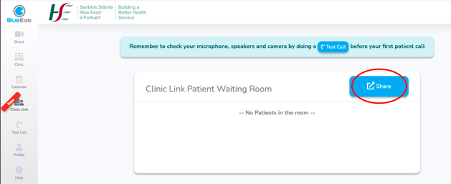
After the ClinicLink is created, you will see below screen in ClinicLink on your dashboard

Share-personalised-ClinicLink HSE Support - Healthcare Professional Guide | RedZinc Services

6.3. How to share the personalised ClinicLink with patients

You can share your ClinicLink with the patients via the text message and email options given on BlueEye, which can be accessed by clicking on the ‘Share’ button (marked red in the above image) on the ClinicLink page.

You can also share your ClinicLink with your patients using the following alternative methods (external to BlueEye)

  1. Text message
  2. Email
  3. Messaging app
  4. Print it on your appointment letter

6.4. How do patients connect over video using a ClinicLink

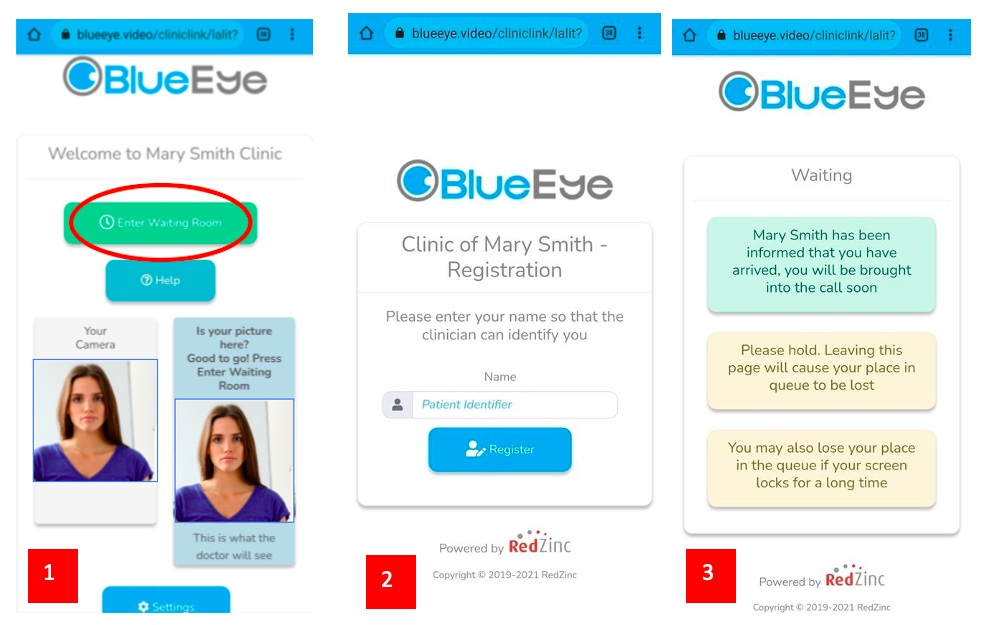
The patients follow the following path to join your waiting room

Click on ClinicLink (shared by you) -> Enter Waiting Room (Refer image 1 below) -> Input name (image 2) -> Enter waiting room (image 3)

How-patient-joins-ClinicLink-call HSE Support - Healthcare Professional Guide | RedZinc Services

When a patient enters the waiting room, you are notified with a sound notification. You can see the list of the patients in the waiting room by clicking on the ClinicLink button in the navigation panel.

The video call gets connected when you click on the ‘Enter Call’ button given against the patient name.

6.5. Controls available during a live ClinicLink call

Add participant You can add a participant to the ongoing call by clicking on the add participant button (given above the video box), entering participant details, and clicking on the invite. The participant will get the secure link to join the live video call. BlueEye Clinic supports up to 20 participants in a group call currently.

Chat You can chat with the participant using the chat option given beside the ‘Add participant’ button.

Share screen You can a document/ report with the call participant using the ‘Share screen’ button given beside the chat button.

Place in waiting room You can send a participant from the live call to the waiting room by clicking on the ‘Place in waiting room’ button. Please note that after you send a participant to the waiting room, you can bring them back to the call by clicking on the ‘Enter Call’ button given against their name in the waiting room.

End Call You can end the video call with the call participant by clicking on the ‘End Call’ button given beside the ‘Share Screen’ button.

Mute participant You can mute the participant by clicking on the microphone icon given in the video box.

Stop audio/video transmission from your end You can pause audio/video transmission from your end by clicking on the microphone and camera buttons given in your video box. Click on the same icons to resume audio/video transmission.

Further Information

30 HSE Support - Healthcare Professional Guide | RedZinc Services

Healthcare Professional Guide

31 HSE Support - Healthcare Professional Guide | RedZinc Services

Healthcare Professional Information Leaflet

Untitled-design-28 HSE Support - Healthcare Professional Guide | RedZinc Services

Patient Troubleshooting Guide

33 HSE Support - Healthcare Professional Guide | RedZinc Services

BlueEye Clinic Patient Guide